


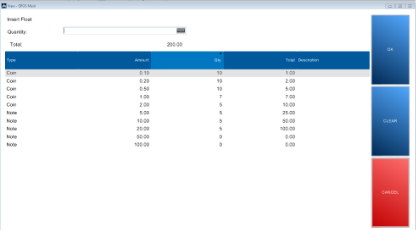
1. Start of Day Float Entry
- The first time that a POS is logged into after an End of Day declaration, the start of day Float Entry screen will automatically appear. The till drawer will automatically open.
- The Fixed Float Amount column shows the amount of cash that was declared to be in the till drawer at the last End of Day declaration
- Click on the Fixed Float button to enter the count of cash by denomination.
- The screen will show the count of cash by denomination that was in the drawer as at the last End of Day declaration.
- Counts of denominations should not have changed since the last End of Day declaration. However, to alter a count:
- Select the denomination line that you are counting
- enter the number that you have counted (this will appear in the Quantity input box) and press Enter on the keyboard; this will record the new count for that denomination
- Check that this quantity now appears in the Qty. column against the correct denomination. Tap OK.
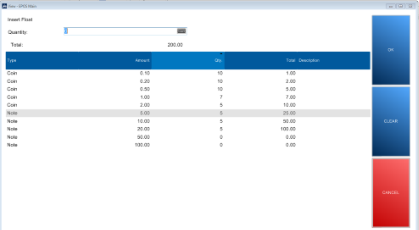
- To print a copy of the Start of Day Declaration Float Entry, press the Print button. This will not show the count by denomination. A count by denomination will show on the receipt which prints after the Float Entry has been posted.
- To post the float click on the POST button
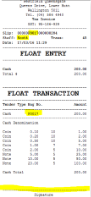
- A receipt will print showing the float entry with the count by denomination. This should be signed and put into the till drawer. The receipt shows the name of the person who completed the float entry and the till number (within the slip number). The Start of Day float entry is now complete and the POS Login screen will re-appear.


2. Expenses
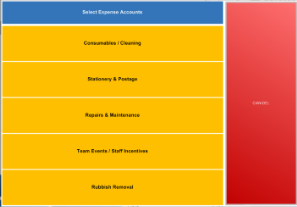
- Tap OPERATIONS
- Tap EXPENSES
- The list of possible expense types will appear.
- Select the expense type.
- Enter the expense amount
 |
IMPORTANT:
NOTE: A typical procedure for paying for an expense will be.
|
3. Snapshot report
- Tap OPERATIONS
- Tap SNAPSHOT REPORT
- Select the date for which to run the report (defaults to today’s date)
- To run the report for all staff, leave the Staff ID blank. To run it for one staff member, enter the staff member’s Staff ID.
- Reading the Snapshot Report:
- Sales by Denomination section
- This section shows sales broken down by denomination
- Cash section
- This shows all cash movements including start of day float, cash sales and expenses
- Tender Declaration section
- This section shows if a tender declaration has been run for the date selected
- Note: This section will only appear for historic dates because the report cannot be run the same day after a tender declaration is done.
- Difference
- This shows the difference if any between the cash movements and the cash declaration
- Note: This section will only be correct for historic dates because the report cannot be run the same day after a tender declaration is done.
- Total Net Sales section
- Shows the $ amount of total sales
- Gift Card Sales
- Shows the $ amount of gift card sales
- Statistics:
No. of transactions Number of sales transactions including refunds and expense transactions No. of paying customers Number of customers who paid for items No. of paying members Number of loyalty club members who paid for items No. of suspended transactions Number of suspended transactions as at the end of day?? No. of voided transactions Number of voided transactions No. of refunds Number of sales transactions that resulted in a negative total (excludes expense transactions) No. of items sold Number of items sold minus number of items returned No. of training Number of transactions undertaken in training mode No. of open drawer Number of times the drawer opened (including sales transactions)
- Sales by Denomination section
4. End of Day Process
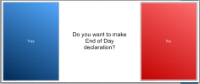
- Tap OPERATIONS
- Tap END OF DAY PROCESS
- Confirm that you want to make an End of Day declaration by selecting Yes from the pop-up screen
- Note that if No is pressed then the system will be return to the main transaction screen but no sales functions will be available. The transaction must be voided and re-started.
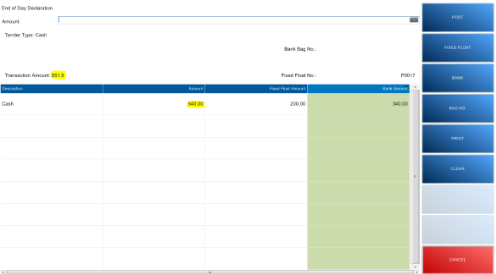
- The End of Day Declaration screen will appear and the till drawer will open
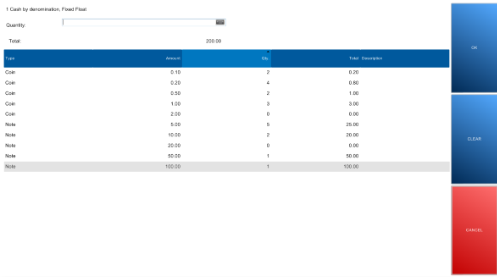
- Select the Fixed Float column header
- Tap the FIXED FLOAT button and enter the amounts by denomination that will remain in the till then press OK
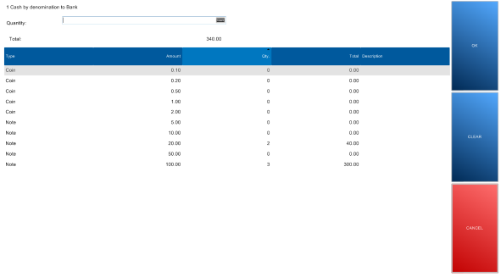
- Next select the Bank Amount column header and tap BAG NO. The system will prompt the staff member for a bank bag number. This can be entered manually or the bank bag number can be scanned in.
- Again select the Bank Amount column header. Tap on the BANK button.
- Enter the count by denomination that is being banked.
- Press OK
- The amount of cash that should be in the till appears next to the Transaction Amount field (highlighted below).
- The total amount counted appears in the Amount column which is the sum of the Fixed Float amounts counted and the Bank amounts counted.
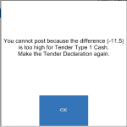
- Tap POST. If the two amounts do not match, a warning appears and the count must be re-done.
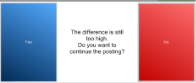
- A re-count should be done. If there is still a difference, the warning will re-appear. This difference warning will be received three times and the count should be re-done each time.
- On the fourth attempt, if the difference still exists, the staff member will receive the following prompt. It is now possible to post the declaration including the difference.
- If there is no difference then no warning will appear and the End of Day declaration will be posted and the login screen will appear.
- Two reports will print:
- End of Day Declaration report which shows what was banked and what remains in the float by denomination
- Snapshot report (see above)

5. Manager Key
There are some functions that require a manager to enter their staff id and password before non-manager staff can continue.
• Discounting more than 10%
• Paying to a customer account
• Switching to Training Mode
- Tap the MANAGER KEY button
- Enter Manager staff ID and password
- The Manager Key indicator at the bottom of the screen will update to Yes
- The function will now be available. Remember to turn Manager Key off once function completed
- To turn off Manager Key tap the MANAGER KEY button again. The Manager Key indicator at the bottom of the screen will return to No.
6. Change Price
- Select the transaction line
- Tap the DISCOUNT button
- Tap the CHANGE PRICE button
- Enter the new price for the item
|
Note: It is not possible for non-manager staff member to change the price of an item. |
- Suspend the transaction
- Manager logs in and retrieves the suspended transaction
- Manager is able to update the transaction to change the price
- Manager suspends the transaction again
- Staff member logs in and completes the transaction
7. Stock count
- Close the POS if it is open
- Tap on Head Office on the LS NAV Start screen if it is open. (Otherwise open LS NAV Start by double clicking the icon on the desktop to open).
- Enter the Store NAV user login id and password
- The Store Manager role centre will appear
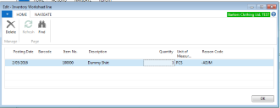
- Click on Stock Counting Worksheets from the left hand menu
- INSERT IMAGE
- Select the store for which you will be creating a stock count worksheet
- Tap ACTIONS and then Calculate Inventory. Make sure the Posting Date is correct in the filter form. No other filtering is required. Tap OK.
- Click on Edit Worksheet to review the worksheet. Click on OK to close.
- With the store worksheet still highlighted, click on NAVIGATE and then Export
- Click on Save and save the file to a USB flash drive
- Give the flash drive to the third party stock take provider
- Physical stock count is performed. The third party provider will then load the final physical count onto the USB flash drive.
- Insert flash drive into the computer.
- Navigate to the Stock Counting Worksheets from the left hand menu
- Select the store for which will created the stock count worksheet
- Click on NAVIGATE and then Import
- Find the USB flash drive and select the correct stock count import file
- Click on Import
- The stock count worksheet will be updated with the physical count.
- Click on Edit Worksheet to review the stock count. The Entry Type column to the left indicates whether there is a positive or negative adjustment for the item. The Quantity field indicates how much adjustment will occur.
- Once reviewed, close the worksheet and click on HOME > Accept to show that the worksheet is ready for posting. A confirmation message will show asking whether you want to compress lines. Click Yes.
|
NOTE: Posting is done by HEAD OFFICE staff. Store Managers cannot post stock counts or adjustments. |
8. Negative and Positive Adjustments
- Close the POS if it is open
- Tap on Head Office on the LS NAV Start screen if it is open. (Otherwise open LS NAV Start by double clicking the icon on the desktop to open).
- Enter the Store NAV user login id and password
- The Store Manager role centre will appear
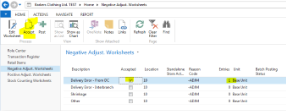
- Click on either Positive Adjustment Worksheet or Negative Adjustment Worksheet from the left hand menu
- Select the worksheet which defines the reason for the adjustment and click on Edit Worksheet
- Enter the item code and the quantity for the adjustment – this is always a positive number even if you have selected a negative adjustment.
- Click on OK
- If an error is made, click on the Delete button to remove the line from the worksheet and re-input it. It is not possible to simply update the quantity.
- Once adjustments for the particular worksheet have been completed, select the worksheet line and click on Accept in the menu. This will show Head Office that the worksheet is ready to be reviewed and posted.

|
Store Managers cannot Post worksheets. |
9. Re-setting staff passwords
- Contact head office to re-set a staff password. These cannot be re-set from the POS.